WINDOW TRIM
Trim is the finishing up, tying off, and making complete the final product. The instructions and many experienced dollhouse builders suggest putting the trim on last. But like anything concerning building dollhouses, you can pretty much do what you want how you want.
 |
| Bay window and circular window trim. |
I did not follow the instructions and general rule of thumb for putting on trim last. I guess you can judge the wisdom of that move by looking at the end result and considering my reasoning for doing my own thing. This dollhouse's exterior trim has 4 pieces: sill, sides, a top curved piece, and a cap. The round windows have a keystone piece on top of that. I chose to put the exterior trim on last because of my brickwork and the method I chose to apply it. The stencil would not allow me to place brick right up to the trim. When applying the brick work, I taped off where the trim would be glued and placed the brick even over the tape. Once it dried, I carefully removed the tape and had a even line of brick to the trim. Once I completed and sealed the brick work, I applied the trim. In the previous entry I discussed in detail how to finish the inner most edges of the trim and the wall to create a smooth, clean appearance.
PORCH TRIM
 |
| Dry fitting the porch trim. |
The porch trim has a circular medallion. I wanted a stylized design and experimented with different stencils before selecting the rose above. I worked in layers by adding colors one at a time, allowing for drying in between layers. I was unsatisfied with the plainness of the porch and considered some decoration of the pillars, either painted on or maybe actual plants.
 |
| Cri-cut designed vines |
I made the vines using the shapes provided for free in Design Space. My vines ended up being a cross between painted on decorations and symbolizing realistic plants. I placed it in a way that I could add on and bring the design down to the yard, if I want it to look like plants. On the porch trim, I still have to add two vines. My link for the vines in Design Space is here.
Little did I realize, I made decisions on the wainscot when I designed the paneling on the staircase. So I carried a mistake forward without realizing it. Once I noticed it, I was well into the build and couldn't change it. I should have brought the wainscot down to the base board piece and not left a gap. It's not noticeable but I know it's there, and now you know too! It only really bothers me in certain locations such as where the baseboard goes around the open doorway.
 |
| Wainscot can be 3 feet or more tall, depending on the style of the house. |
Because I had the coffered ceiling and the wainscot, I did not add molding and baseboards to the first floor. However, I did add much simpler designs to the second floor. I found that Home Depot has cabinet trim in their lumber section that works perfect for 1:12 scale dollhouses. The toughest part in working with molding or baseboard is cutting angles to go around the room. I found that by making left and right side models of 30, 45, and 60 degree cuts, both for turning in or out around corners, I saved myself a lot of trim down the road. I would use the model to make sure I knew which cut I needed, then I made sure to replicate that cut by positioning my trim on my tool correctly. It didn't matter that I was using a miter box or my Proxxon circular saw, how I placed the trim made a big difference to cutting it correctly.
 |
| Second floor baseboard is simpler. This floor is still missing molding. Those sloped ceiling sections are tough! |
In the attic. I decided to make it partially finished. So I found a Google image of painted exposed rafters and decking. I recreated that here. I painted the underside of the roof sections a very dark blue. I used square dowels I found at Home Depot cut to scale for my rafters, and wide popsicle sticks for the decking. Then I painted everything the same cream as the first and second floor. I used the yellow from the center of the flowers in the bathroom that went well with my music wall paper (in another attic room) to keep continuity. I chose light colors in the attic because there aren't any windows and darker spaces. Also, it went with the pine stain on the floor.
 |
| Partial attic snapshot. You can see into tower, which has a surprise in the ceiling. |
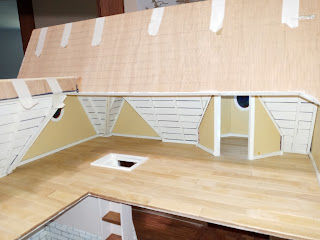
BAY WINDOW ARCHWAY TRIM
None of the bay window area arches had trim in the kit that I could find. So I made my own. I used balsa wood for the curve of the trim over the doorway. Just be aware balsa is very soft. So when clamping to hold the trim in place for gluing, place a piece of wood over the trim where you will clamp. That way you avoid making clamp impressions into the wood! Adding wood to both sides of the archway opening for trim creates a wood "sandwich" where you can see the three layers. So I used drywall mud to seal, smooth, and fill in those layers. I sanded and sanded and sanded before painting.
 |
| Check out the bay area archway trim! |
In order to make my trim closely align with the bay window archway, I traced the opening onto a piece of paper. Then I measured points 3/8" above my original line, connecting all the points to create 2 parallel lines that followed the shape of the archway. I cut out the paper and secured it with tape to the balsa wood. Then I cut the balsa wood with my exacto knife. I copied the style of window trim by bringing the top of the archway down a little ways on either side where it would meet up with the side trim.
SUBWAY TILES
Subway tiles were popular in late 1800 Victorian houses, which were just beginning to include indoor plumbing in the new houses, and retrofitting closets as bathrooms (hence the name "water closet" for a bathroom in England). Subway tiles are ceramic, but I didn't have any mini ceramic tiles. So I made some from one inch length of popsicle sticks. I used a popsicle stick to help space the tiles evenly from row to row by placing the stick across the bottom row of tiles and placing the new tiles on top. It worked well for the horizontal, but some of my vertical spacing isn't as even as I'd like. I cut one inch sections of wooden skewers and then did my best to split them evenly into quarters, lengthwise. I needed a straight edge to go on top of the topmost tiles and a straight edge to go against the wall. This left the curved part as the decorative piece.
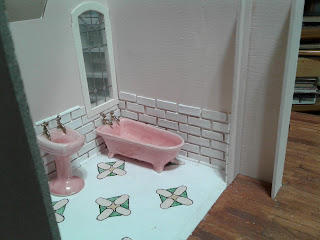 |
| Homemade subway tile from popsicle sticks and skewers. |
To make the tiles appear more like ceramic, I used a glossy white paint. Then I sealed it with Modge Podge. I mixed a little grey paint into some drywall mud for the caulking. I was going to use caulk, but got over excited and started applying the wrong thing. The drywall mud was very hard to remove from the tiles. And I ended up repainting the surface of the tiles because they looked dirty even after I wiped off the excess. I think if I do a subway tile room again, I will leave very little to no space between tiles to improve the appearance.
Trim and the extras can be done at anytime in the building process, depending on what type of materials you are working with, and what process you are using to apply them. Also, when you trim will be decided by how accessible your workspace it. Remember, that pesky stairwell? I forgot to add molding there, and now it is too late! So to prevent future "oops" moments, I create a punch list of everything that needs to be completed for a floor before adding the ceiling. That way I don't move forward without any important parts being completed.
Next Up: Greenleaf's Pierce 9: Fireplaces and Chimneys
Comments
Post a Comment